Wednesday, August 31, 2011

Ohhh, la la

Here is a cute little Frenchie end table/chest I just finished.  The table was in good shape except for the top which had several water stains and the finish was peeling off. I almost forgot to take a before picture  but here it is with a drawer sitting on top.


Curvy little gal isn't she?  Just look at those legs! 


To start refurbishing her I sanded the top and since I would be using Annie Sloan Chalk Paint I just cleaned the rest no sanding needed.


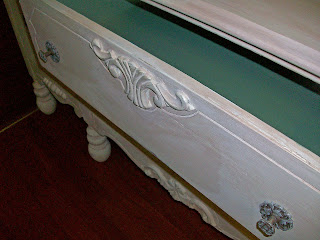
I then applied Old White to the sides and legs and Louis Blue to the drawers.  When that was dry I made a wash of Louis Blue by mixing equal parts of paint and water and applied it to everything I had painted white and wiped off the excess.


Next I made a wash with the Old White of equal parts paint and water and applied it over the drawers and again wiped off the excess.


The drawer pulls I painted with two coats of Old White.  I really like the way it turned out the drawers almost look like they are suede!  Here are the after pictures.


After I took these pictures I added some white rubber feet to the legs and lined the drawers.


Hope you enjoyed this project until next time happy painting.

I've entered this table in the following lovely ladies parties:


HOG


Saturday, August 27, 2011

Two Before & Afters

Today I've been so busy going to visit a cousin who is not well and stopping at a local flea market for some things for my booth. I found some great nick-knacks and a couple of mirrors.  I love to redo mirrors. :-)

My booth is nearly empty so I have been hard at work getting some more furniture ready to take next Tuesday. I thought I would take a minute out to share a couple of things I just finished with you.

First is an old mirror that probably went with a dresser at one time.  It is a very heavy solid wood mirror with a fan like design at the top. Here's the before.

...please ignore my terrible carport with half finished projects.


Here's the after.

...hmm mirror looks great.  Reflection? not so much


I also just finished a antique rocker. I am certainly not a professional upholsterer but like I have blogged about before  my Grandmother recovered her chairs so like her out of  necessity I taught myself the basics.  Upholstery is not my favorite thing to do so I don't recover a complete chair very often. Here's the before.


And here's the after.


Okay, I know you have an old mirror or an old chair just sitting around collecting dust.  Get out your material and a paint brush!  If I can do it anybody can.

Monday, August 22, 2011

Chest Deep In Trouble

As I mentioned on Facebook today I bet a lot of you were wondering why it was taking me so long to finish this chest of drawers.  Well I started the whole project in the wrong way as I had just bought a complete estate of furniture and was in a hurry to get started on it and didn't take time to consider how I wanted the chest to look when I finished.  


I always take time to sort of let a piece of furniture talk to me in a way, sometimes I'll even put a piece aside until a clear picture of the finished piece comes to me.  I didn't do that with this chest and it was a big mistake!


I ended up painting the chest twice! I first painted it plain "Paris Gray" which is a lovely color but it didn't have that soft look I like to achieve so next I applied a wash of "old white" and it ended up looking like a bad paint job. :-( 


Finally I wised up and just quit working on it and just debated  on what I wanted to do with it overnight.  Then inspiration hit and today I painted it again with a wash of "Paris Gray". Yeah, I love it!


The wash of gray let a little of the white come through giving it a softer appearance that I love and I hope you will also.  Here's the before picture.


It didn't look to bad but really was just ordinary and who wants ordinary in their homes? Not me!


I painted the handles twice also, the first time black, which my husband liked best, but they seemed too harsh for the piece  so I painted them with "Old White" chalk paint and he agreed they really looked good.


Here are the drawers painted first in a coat of "Paris Gray" chalk paint.


Then washed with "Old White".


The top I stripped and stained with "Dark Walnut" stain.


I then applied a wash of "Paris Gray" and the insides of the drawers I painted with three coats of a lovely buttery yellow. I love to paint the drawers or inside of a piece to give my customers a clean, lovely surprise when they open them.


I then applied two coats of a clear wax to protect and age the piece and here is the final product.


Notice the variation in depth of color with occasional touches of the white showing through.  


I hope you think it was worth the wait and would love to hear your thoughts on the finished product.  I will be painting the matching dresser next and hope to sell them as a set. Thanks for stopping by.

Saturday, August 20, 2011

Restoration Linky Party

Here is your chance to enter one of your restoration projects for a chance to be featured on It's So Very Cheri's Blog! Enter below to join the Blog Hop.


Click on the project you like to vote.


By submitting your project you agree to let It's So Very Cheri to use your images and comments.

Friday, August 19, 2011

From Brass to Class

I'm still working on a matching dresser and chester of drawers but I thought I'd share a small project I just finished.

I went to a local resale shop and found a couple of brass candle holders that had seen better days. Here's a picture of the before.


Definitely needed something didn't they? Well I got out the chalk paint (love that stuff) and gave them three coats of "Old White" and I could have left them at that but you know me that was just too easy.  So I got out "Henrietta", another color of chalk paint in a lavender pink, mixed it with lots of water about a 10 to 1 ratio then applied the wash to the candle holders and blotted it with a paper towel to give a mottled look. After that I decided they were a little too pink lol and gave them a wash of the "Old White" mixed with about the same ratio of water as the pink, and here's how they turned out:


They are a little pinker than my pictures show and yes I know I need to refinish my antique dining table lol.  I also just realized I was concentrating so hard at getting pics of the finish I did not get a whole picture of the candle holder. 
:-0 Anyway I think they would look great in any home but especially in one with "shabby chic" decor.


Hope this inspired you to get out that paint brush.  Thanks for stopping by.

Monday, August 15, 2011

No Money For New Floors? No Problem! Paint Your Floors!

Do you need new hardwood floors but don't have the money? Have you just added on to your home or built a new one and its time to buy flooring and you are over budget? I have a cheap solution for you that will still look fabulous!

A few years ago my husband built an extension onto our home and did a marvelous job of it considering he had never built so much as a dog house in his life! When we began the interior decorating we realized we did not have any funds left in our budget for new flooring.  After thinking it over for awhile I suggested we paint the plywood sub-floor.  Well my husband was very skeptical, but agreed, and we worked out a plan to get it done.  Here's what you will need if you are planning to paint a plywood sub-floor:
  1. wood filler
  2. large electric sander
  3. vacuum cleaner
  4. damp mop
  5. measuring tape
  6. painter's tape
  7. smooth paint roller
  8. porch paint in your chosen colors
  9. polyurethane
  10. several days (to allow drying between coats)
  11. lots of patience 


If you are painting wood floors you probably won't need wood filler (unless they are in really bad shape) or the sander. You could also do this to concrete floors using concrete paint.


Here are the steps for painting the wood sub-floor

  • First we filled in all holes and rough spots with wood filler.
  • Next we sanded and sanded and sanded :-)
  • Then we thoroughly cleaned the floor


oldhouseweb.com


  • You will not be able to enter the room for several hours so plan ahead. We painted right before bedtime.
  • Follow porch paint instructions and paint the entire floor the lighter color starting opposite of your exit point and finishing at exit
  • Allow to dry overnight
  • If necessary apply second coat
  • Dry overnight
  • Next using painter's tape measure & tape out your design
  • Paint in darker squares (we chose 4" x 4" squares)
  • Allow to dry overnight (I told you it would take patience!)
  • If necessary apply second coat
  • Dry overnight
  • Porch paint is very durable but we decided to add a coat of polyurethane for extra protection
  • Allow to dry for at least 24 hours or according to polyurethane instructions
That's it! your finished! And most people won't be able to tell that you don't have linoleum! Guest would always compliment us on our floors and were surprised that they were painted.  I really wish I had some pictures to share with you but we covered our floors with laminate a couple of years ago and did not take pictures so here is a floor very similar to ours but we painted ours a deep blue and cream with a gold border, it was not distressed, and ours was the sub-floor not wood slats. 


houzz.com

A word of warning: A freshly painted floor is very slippery! Be careful! They are also very durable and can last for years. Clean them according to paint directions.

Here are a few more pictures of some beautiful painted floors.


houzz.com


marieburgosdesign.com


designaustin.blogspot.com


http://aquieterstorm.tumblr.com


As you can see by the pictures above, (I love, love, love the last one don't you?) you may also stencil your floors with a lovely design.  Paint your floors the base color and dry overnight. The next day measure and apply your stencil. Dry overnight. Your finished. Gorgeous.

I hope I have inspired and encouraged you to give this project a try. 

Hugs,


Friday, August 12, 2011

Delightful Buffet

I really enjoyed working on this piece and I think it turned out lovely.  Here is the before picture:


Don't you just love those huge gold drawer pulls and wood appliques? lol  Okay here it is after I finished:


First of all I had to sand & strip two layers of paint as it was peeling off because whoever painted it did not prime the piece first.  If I had painted over it more than likely my paint would have peeled off also.
I removed all the different latches from the inside of the doors as none of them matched and my husband put in magnet latches.  I counted pieces of three different types off latches in each door. 


I then painted the buffet with "Old White" chalk paint two coats and then antiqued it with an Espresso acrylic paint. After that dried I applied a wash of the "Old White" chalk paint using 3 parts water 1 part paint. After that I waxed the entire piece with a light colored wax leaving it to dry without buffing.


As you can see I then painted the inside of the drawers and areas behind the doors with a beautiful spring green.  I love that surprise of a lovely color every time you open the drawer. 


I decided to use the original brass knobs just removing the large wood applique behind them. I sprayed them with a brown textured paint then dry bushed with the "Old White" chalk paint to bring out the lovely floral details. They almost look good enough to eat!  I then waxed the entire piece again with a light colored wax and did not buff as I wanted that aged look.


I hope you enjoyed this before and after.  I have several pieces I am working on and will share more soon.


I'm sharing with the following lovely parties:

Wednesday
Wow Us Wednesday


Thursday, August 11, 2011

So Sweet

I finished this dresser yesterday and thought I would share the before and after with you even though my pictures didn't turn out so great.  


I started out by adding the wood onlay to the front back (did that make sense lol) then I painted it with Barely Pink three coats in an eggshell finish.  I used Old White chalk paint to make a wash using about 3 to 1 water and paint and went over it with that.  


The drawer pulls were mixed matched so I kep the three that matched and added the two on the large drawer and painted them all with Old White chalk paint.  It turned out so sweet!  I then waxed it with a light wax.


To care for a piece painted like this just spray with any cleaner then re-coat with a light wax.  Buff if you want a sheen or don't buff if you like the aged look. This dresser would be great in a young girls room or even an adults with that shabby chic, cottage decor. 


Hope this inspires you to get out that paint brush. Here are the before and afters.


Sad isn't it?


Sigh, I really need to take some photography classes.


I should have pics of a buffet ready for tomorrow.  Thanks for looking.


Sharing with the following linky parties.


Tuesday, August 9, 2011

Soooo Busy

I've been very busy the last few days buying three rooms of furniture from an estate and pickin' here and there. I have also been working on a couple of pieces that I should have ready tomorrow and can't wait to share the pictures with you!


I also have an end of the summer sale going on in my booth at King's Antiques and so far it has been going really well. As a matter of fact I really need to get those pieces done as my booth is looking kind of skimpy.


I truly love what I am doing and hope it shows in my work.  I would love to hear from those of you that are busy doing the same type of projects that I do or that are pickers.  I have found during my travels that a style that is popular in one area of the country may not be popular somewhere else so I would really love to hear what type of furniture, paint techniques, or antiques are really selling well in your area of the country.  Here in Texas its burlap, pottery, and re-purposed furniture. 


Here are a couple of pictures  of my booth I took recently.  I hope all your endeavors are successful and you are happy in your work.  I'll share a new project probably tomorrow.


I forgot to move my new handbag from the telephone bench don't you just love it? I love my handbags. LOL


Total Pageviews

LinkWithin

Related Posts Plugin for WordPress, Blogger...