Friday, April 27, 2012

I Have Really Been Busy

I have really been busy but I thought I’d stop for a minute and share a few of the pieces I have finished.

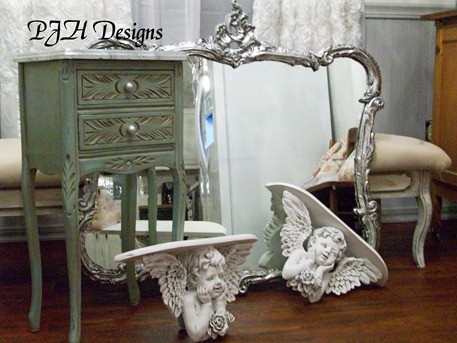
vignette1


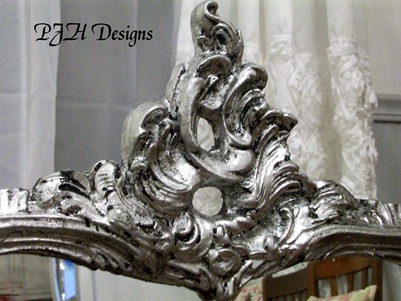
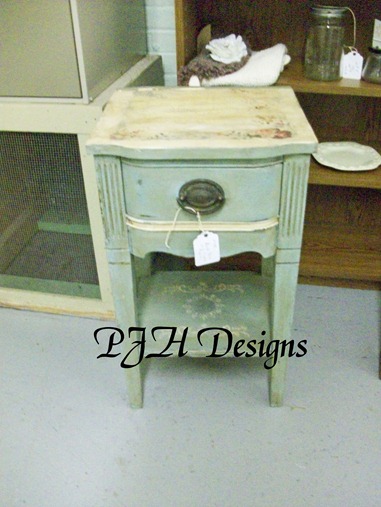
A silver leaf mirror that will go in my eat in kitchen.  Two angel shelves and a duck egg blue occasional table with silver leaf trim that are going to King's Antiques.


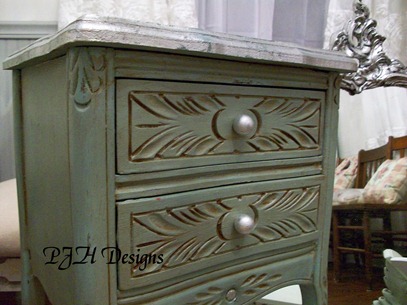
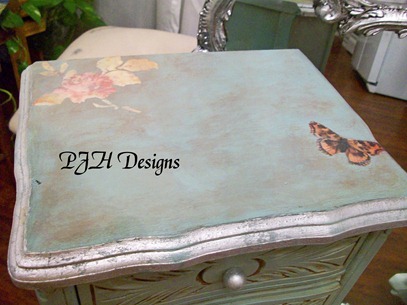
silverleaftable


angel


mirrortop


silverleaftable2


I’ll be sharing the details on how I completed this little table later.  The bench in the background is from a previous post.  I just fell in love with it once I had finished refurbishing it  and decided to keep it. 

By the way, these pictures were taken in my new kitchen so you are getting a sneak peek. Princess

Have a great weekend.

Thursday, April 26, 2012

My Butcher Block Counter Tops Are On Remodelaholic's Blog!!!

Hi Ya'll from down here in beautiful East Texas! Hope your day is as beautiful as mine has turned out to be!

I just wanted to share with you that my blog is being featured today on "Remodelaholic". Don't you just love that name? I can relate to the concept of their blog as I never seem to get through remodeling! Always something else I want to refresh, add on, or change. lol

Cassity and Justin really liked my how-to on building my butcher block counter tops and chose them to feature today. You can see the article here.


Thanks so much Justin & Cassity!  You need to check out their blog on remodeling. They feature all kinds of wonderful projects from other bloggers that you can adapt to your space and they save you lots of money in the process.  They also share all their remodeling projects as they have refurbished and sold several homes. Great blog! So be sure and stop by Remodelaholic!

I 'd like to thank all my new followers for joining my blog and all your wonderful comments. I am honored that you like what I do.

I'm still working on the kitchen reveal.  So many small projects to do plus I'm working on several projects for the shop.  I promise the reveal will be soon and hopefully my pics of the counter tops will be better.  They were still wet when I took the first ones. :-)

  Ya'll have a great weekend.


Wednesday, April 25, 2012

Free Graphic Wednesday #27

Hello friends.  I hope your week has been great so far. It has been beautiful here in East Texas and I’ve been staying outside in the lovely weather as much as possible.

Here are your free graphics for this week. Enjoy.

motherchild

Here’s a beautiful picture for your Mother’s Day crafts. I just love this one.

flowers

lobster

Everyone should have a lobster pic. In love


swanrose


girlflowers

Love this little curly headed blonde.


girlflowers2

I know you are going to make gorgeous things and I would love to see them. Send me a picture @ pjhdesignsinfo@gmail.com and I could feature your project next week.

signature


Here are the rules for using these images.

  • The above images are free and for personal use only they are not for re-sale.
  • International viewers please check the copyright laws for your country.
  • I do research the images to check if they are copyright free to the best of my ability before I share them with you, and because I am providing the graphics for free I am not legally responsible if you use these images and are sued for copyright infringement. It is totally your choice to use or not use the images.

Friday, April 20, 2012

Duck Egg Blue Side Table & A New Wiki Antiquing Site


Happy TGIF everyone hope its been a good one so far.
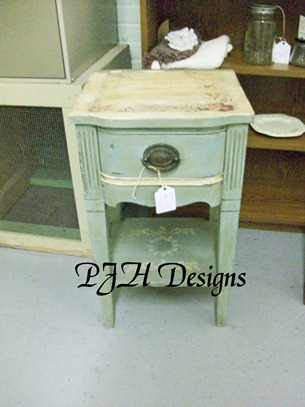
Today I’m sharing the before & after of this cute, vintage side table.

finished

But before I do I wanted to share with all you bloggers and antiquing fanatics (like me) a new Wiki site I found out about that will be listing flea markets, antique shops, re-sale shops, etc…so that anyone traveling will have a one site listing to search and find the best places to shop. Their goal is a complete directory of all the above locations in every city around the world.
A true antiquing guide that is free for everyone. Plus you can add your favorite shops and flea markets located in your area.  Here is the link:  MYcityantiquing.org

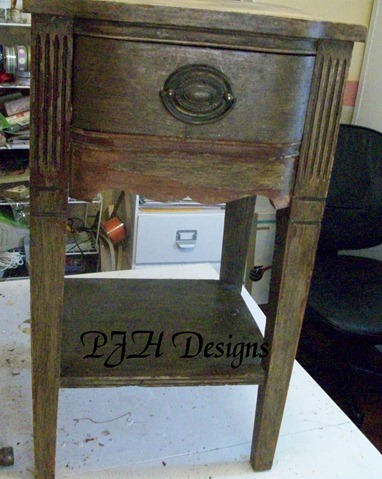
Okay, back to my little table redo.  It was a sad little table as they usually are when I find them.  Here’s the before.

before2

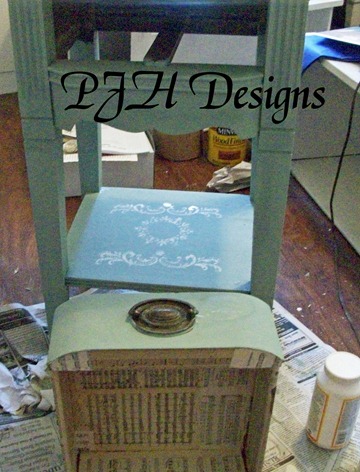
Kind of blah, huh? But it has some great details going for it so I painted it with Annie Sloan’s Duck Egg Blue, which I absolutely love! I then decoupaged the drawers with vintage music sheets and rose pictures.  Which I forgot to take a picture of! When you slide out the drawer you see the roses and music sheets on the outsides of the drawer.

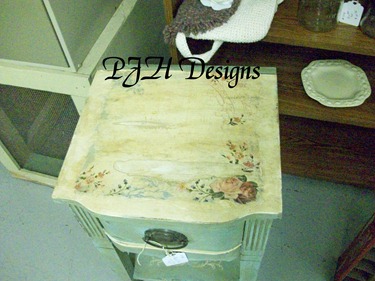
I also decoupaged a lovely scrapbook page to the top and added a stencil at the bottom.

painted

I could have sworn I turned that drawer sideways and took a pic. Oh well, sorry, I’ve already taken it down to Kings Antique’s but if it is still there next time I go by I’ll try to get you a picture.

I then glazed it with a burnt umber glaze to age it, waxed it with clear wax, and then distressed.  Finally, I applied another coat of wax and after that had dried I added coat of satin polyurethane to just the top for added durability. The drawer pull had that vintage look I wanted so I just cleaned it up and put it back on.

top


finished

Hope you enjoyed this quick project.  Have a wonderful weekend. Princess-

signature

Wednesday, April 18, 2012

Free Graphic Wednesday #26

I really am tired as I've had a busy day but I wanted to share my free graphics with you before I called it a night.  Enjoy

mother


I’ve been saving this one for our Mother’s Day crafts. So pretty.

mother1

yellowbird

Canary & rose

reddress

Isn’t she adorable?

flowercar
Gorgeous blue flowered car.  


Enjoy the rest of your week.

signature


Here are the rules for using these images.

  • The above images are free and for personal use only they are not for re-sale.
  • International viewers please check the copyright laws for your country.
  • I do research the images to check if they are copyright free to the best of my ability before I share them with you, and because I am providing the graphics for free I am not legally responsible if you use these images and are sued for copyright infringement. It is totally your choice to use or not use the images.

Sharing with the following parties:

Thursday
Thrifty Thursday  36th Avenue Party Time

Sunday, April 15, 2012

Kitchen Remodel: Tin Ceiling Tiles


I was thinking today that I had not shared much with you about my ceiling in my kitchen renovation. 
Yes, I did share how to remove a popcorn ceiling, and you may view that blog post here, but I did not share what we did afterward.

I removed the popcorn ceiling because at the time I had planned to put up the fake tin ceiling tiles and needed a smooth surface, but I found the money for my third splurge and bought the real metal ceiling tiles instead. If I’d had my way I would have used antique tiles but finding enough at a reasonable price is almost impossible in this day and age.


Here is the pattern I chose and the color is Satin White.  The paint is a powder coat and should last for many years. 

I chose the 24” x 24” tile as I felt with such a busy pattern the smaller 12” x 12” would be to just to much.  When they arrived I was so pleased and felt I had made the right decision. What do you think?


The tiles came from The American Tin Ceiling Company. I chose them as they are snap-lock and suppose to be easy to install.  Once you line up the first row making sure to measure and keep it straight then you are good to go for the rest of the ceiling.  You will need to measure at each side as you start a new row to make sure you keep everything square.


  You start by screwing them to the sheetrock on two sides and then the next tile slides into slots on the one you just screwed in on the opposite two sides locking them together.

The only problems we had was that the slots were not open all the way across the sides, and you had to work to open them wide enough to be able to slide the next one in. Also, the corners were never the same so each square did not always match up perfectly.


You will notice in the previous two pictures the small pieces cut to fit at the end of the row. By the way, you can cut the tiles with a pair of metal cutters. To hold this piece of tile out from the wall once it has been cut you can slip in one of those wood wedges and screw it and the tile to the ceiling.

I saved quite a bit of money by using this wood trim instead of ordering the metal trim the company offered.  Anyway, it would have been too wide for my kitchen as there is only a couple of inches from the top of my cabinets and the ceiling. You can see in the pictures how great the trim looks with the tiles.


One thing that has always upset me about our house are the low ceilings, but that is a totally different blog post that I will share with you later. Princess


Here is a quick look at the finished ceiling and just a tease of my new chandelier!

I couldn’t believe how much brighter my kitchen is now with the white metal tiles that are shiny in themselves plus they reflect so much light.  I think they are just gorgeous!

The American Tile Company offers a very detailed video on how to install the tiles if you choose this route for your ceilings. 

Thanks so much for stopping by and the kitchen reveal should be ready later this week.

Thursday, April 12, 2012

Finally the Drexel Buffet


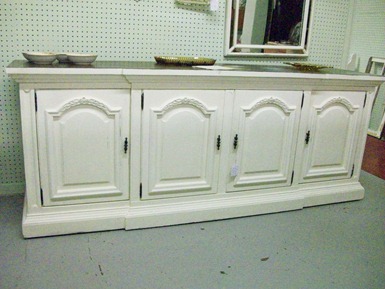
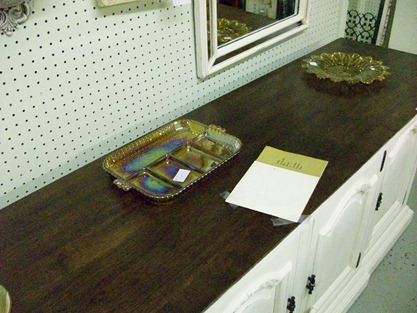
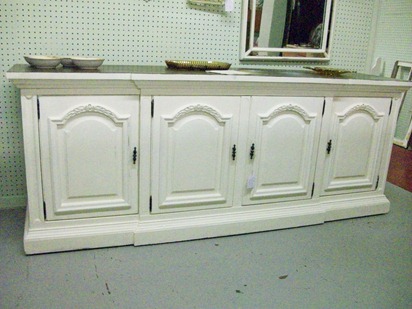
Well, I finally finished the Drexel buffet.  I have never had so much trouble finishing a piece of furniture!  Here’s the after.

drexelbuffet1

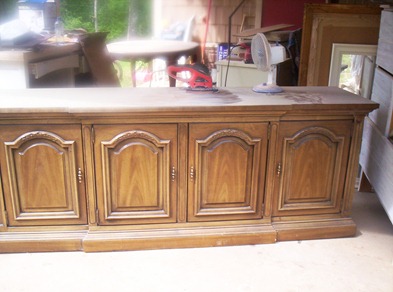
Now here is the before.

drexelbuf

This is a 1963 Drexel buffet I picked up at an estate sale.  It has the Drexel stamp in the top drawer along with the original pamphlet that came with it.

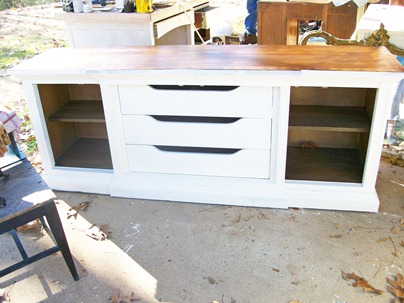
I started out by removing the doors and hardware and sanding the top.  I then painted the bottom of the buffet with Annie Sloan “Old White”.  The hardware was spray painted with a satin black.

drexelbuf1

The top I sanded down and refinished with Dark Walnut stain and then applied four coats of satin polyurethane.

This is where I had problems.  I had completed the buffet and covered it with a plastic drop cloth over night as a storm was coming through and I had it sitting out on my carport.  During the night a half full can of polyurethane was blown over onto the top, and by the time I found it the next morning it was a half inch thick all across one end of the buffet and hard, very hard.  I had to strip it down again! What a mess! Anyway here is the finished top.

drexelbuffet3

drexelbuffet2


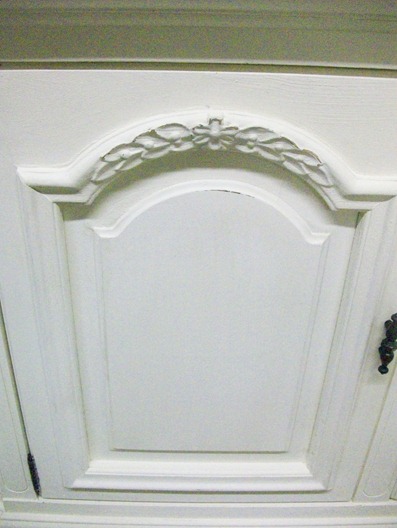
A close up of the doors.  After waxing with Annie Sloan Soft Wax I slightly distressed the entire buffet focusing on the areas mostly likely to be worn.

drexelbuffet1


Hope you enjoyed this before and after.  Have a great week end!

signature

Sharing with the following parties:

Wednesday, April 11, 2012

Free Graphic Wednesday #25

These images are free for you to use as you choose.  

pinkrosegirl

pinkrosegirl2

I think she is just adorable.

ribbonheart

ribbonheart2

whiteroses

horshoeflowers
horshoeflowers2
airplane

frenchcard

Have a great week end.

signature

Here are the rules for using these images.

  • The above images are free and for personal use only they are not for re-sale.
  • International viewers please check the copyright laws for your country.
  • I do research the images to check if they are copyright free to the best of my ability before I share them with you, and because I am providing the graphics for free I am not legally responsible if you use these images and are sued for copyright infringement. It is totally your choice to use or not use the images.


Sharing with these lovely parties:


Thursday

Tuesday, April 10, 2012

Winner of the $25 Gift Card

Well I'm up early this morning painting an end table! I so need to get some furniture up to my booth at King's Antique Mall in Shreveport.  I really got behind doing my kitchen remodel but I'm so loving my new shabby chic kitchen!

I'm waiting for curtains to come in and I need to put trim down around cabinets after installing the new flooring, and then of course add some pretties to the walls.  I'll be sharing soon.

Now on to our winner of the $25 Home Depot card.
The winner is Mary Ellen who said "Following via Facebook also"
Congratulations Mary Ellen please e-mail your address to pjhale72@gmail.com so I may mail your gift card.

Thanks to everyone for entering & for following my blog.  I hope I can inspire you to make your home unique and totally you.  Have a great day.

Friday, April 6, 2012

Kitchen Remodel: DIY Distressed Vintage Cabinets

Hello ladies! How are ya’ll? Good I hope and ready to learn how to give your cabinets a distressed vintage furniture finish.
Before I start though I would like to remind you of the $25 Home Depot gift card I am giving away in celebration of finishing my kitchen.  I thought it would give one of you a start on your next project. Click here to enter.


Here is how my cabinets looked after I finished but before I put on the hardware.


This is a view of the bottom cabinets.  The top cabinets were done with a lighter finish. This is what I started with your basic oak finish.


Tip: When you remove the doors and drawer fronts number them so you know where each one goes when re-hanging them.

Here is how I completed the top cabinets.

First I painted them with Annie Sloan Chalk paint in Pure White.


Next I mixed black pigment with a glaze and brushed it on.


I then took a dry rag and removed the glaze.


After I had removed most of the glaze leaving more in the details I decided It was not light enough for me and I wiped it again with a damp cloth to remove more glaze.


After they were dry and re-hung I still wanted the top cabinets lighter so I went back and dry brushed more Pure White on them.  Finally I was satisfied. Smile


I then used ASCP clear wax applying it with a brush and wiping off excess with a rag as I went.  I then distressed them and when they were dry applied another coat of wax. To finish I buffed them to a light sheen.


My bottom cabinets I wanted a little different so I started by painting them with ASCP Paris Gray.  I then followed the steps above except when I applied the black glaze I sort of slopped it on every which a way so that when I followed up with dry brushing the white on I would have more texture.

Here are the pictures showing you the steps.


First one with glaze and the one at top after wiping with dry cloth.


End of bar after glaze had dried.


By the way these are the front of the cabinet drawers they pop off which made them much easier to paint.  This one is after about two coats of dry brushed Pure White. 

Dry brushing is a method of using a dry brush with most of the paint wiped off.  When you first start applying the paint you are barely touching the surface and as most of the paint is used you will press harder.  You never want to get a solid looking brush of paint on the wood.

After each coat dries you continue adding the white with a dry brush until you get the look you want.   I think I applied a total of five coats in this manner.


Now here is where the bottom cabinets start to really look different.  Next you wax them using the soft clear wax wiping off the excess with a dry cloth.  I then took one of those gray sanding blocks and started distressing them. Resulting in the gray paint showing through in spots like they had worn over time. 

You want to distress anywhere you think they would naturally wear. Around the handles and pulls, on the corners, at the base, etc.  After all that scrubbing and rubbing they look like this. 


Corner top cabinet showing new bottom trim around cabinets.

To finish them I used different pulls on the top, the drawers, and the bottom doors to look as if they had been added at different times.

We only have a few small things to do before I share my completed kitchen.  I hope you are inspired to take your cabinets on as a spring project.


Oh yes, by the way, here is the inspiration picture I used to base my kitchen cabinet remodel on.


habershamhome.com

In a comparison of the inspiration picture and my finished cabinets I think I managed to upgrade my stock cabinets beautifully.  What do you think?


Thanks for stopping by and I am sharing with the following lovely ladies.


Friday
Feathered Nest Friday Inspiration Friday Furniture Feature Friday
Frugal Friday Show & Tell Friday Friday's Unfolded Friday Feature Party

Saturday
Show & Tell Saturday Get Schooled Saturday Spotlight Saturday
Whatcha Got Weekend  Saturday Night Special

Sunday
DIY Showoff Sister Sunday Link Party Sunday Blog Love
Sunday Scoop Link Party Nifty Thrifty Sunday Sunday Show Off
It's Party Time

Monday
Show Off Your Cottage Monday Creative Bloggers' Party & Hop Creative Me Monday
More the Merrier Monday Mop It Up Monday Mix It Up Monday

Tuesday
Nifty Thrifty Tuesday Tuesday's Treasures Trash 2 Treasure Tuesday
Twice Owned Tuesday Annie Sloan Chalk Paint Link Party
Take It On Tuesday

Wednesday
Wow Us Wednesday  POWW 83 A Furniture Link Party
Success U Link Party  Restored It Wednesday  Be Inspired
White Wednesday

Thursday
Transformation Thursday  Thriving on Thursdays Thrifty Thursday


Total Pageviews

LinkWithin

Related Posts Plugin for WordPress, Blogger...